
THE FIRST STEP IS CHOOSING THE CORRECT TOOLS AND LEARNING THE PROPER TECHNIQUES
ARTICLE DATE: August 1994
One of the earliest lessons I learned about aircraft building was that when in doubt, look it up in books and read all about it. Either that or ask somebody with more experience.
Like many other lifelong aviation enthusiasts, I started out building simple all-wood model airplanes. As time went on, I built increasingly larger ones — many of them 1/4 scale replicas of the full-size planes I’d actually flown myself, but still mostly all-wood ones, with fabric-covered wings and tail surfaces.
About ten years ago, models started becoming more complex, and some of the plans and kits I was building from called for me to work with fiberglass, kevlar and carbon fibers. With the help and advice of reference books and good friends, I taught myself how to use these materials.
I learned to make molds, lay up the glass, install the formers and marry the parts into a working aircraft. I found that the building techniques used in building a model from these materials are exactly the same as those used when building a full-size composite aircraft (though I haven’t tackled one of those yet).
Although I’ve used composites to a limited extent, I’ve always preferred building tube-and-fabric aircraft. I trust the strength of steel, and the reliability of good fabric, from the cotton coverings of the Wright brothers’ aircraft, to linen during WWI, and then to the polyester fabrics of today.
I learned how to cover from having partially rebuilt many aircraft over the years, some of them the control surfaces on a whole lot of North American Texans. But that was where my talent ended — just a tad short of all the knowledge and skills needed to completely build a tube-and-fabric aircraft.
Not only was totally ignorant about how to weld, I couldn’t even tell a brazed joint from a TIG masterpiece weld. What I did know, though, was HOW TO LEARN. Whenever I needed information of any kind, I’d always head straight for my local public library first.
Even though ours is a fairly small one, I almost always find what I’m looking for. This time, though I found numerous books about welding and welding equipment, I couldn’t seem to find one which described how to weld 4130 steel tubing — the grade used in light aircraft construction.
So I went directly to the very best source of information, and called the EAA — the Experimental Aircraft Association — in Oshkosh, Wisconsin. The EAA produces thousands of books about aircraft and every related subject you can think of.
The person who answered the phone told me there were dozens of books about welding available, and there was even a shareware computer program which taught the techniques of gas welding. I sent away for everything pertinent.
As soon as all the literature and other materials arrived, I began my search for welding knowledge. I was determined to learn all about welding because I wanted to know how to weld up a fuselage for a homebuilt.
I’ve found, from personal experience, that the best way to learn any new skill is first, to immerse myself thoroughly in the reading material (I always bring a technical book to read in bed at night, and usually get through several chapters before I fall asleep).
Once I’ve absorbed the information, I take a hands-on approach and tackle the job by actually using the recommended tools and materials. As I delved into the books I learned that, as is the case with many other occupations and trades, welders have their own unique language which includes special shorthand symbols which indicate how a particular weld should be made.
Fortunately for home builders, one particular type of welding called oxyacetylene welding is still one of the most highly recommended methods of welding SAE 4130 tubing. While looking around for a oxyacetylene welding unit to buy, I stopped at a local swap meet and found one, complete with tanks, cart, and torches, for under $200. (Since then, I’ve seen others for sale in excellent condition for even less, but mine suits my purposes just fine.)
The books said that 4130 welds about the same way as mild steel, but that it’s susceptible to air hardening, and could become brittle from improper welding techniques, and they recommended the use of 1/16-inch-diameter, bare metal, mild steel rods to practice with.
The next day, I went to our local welding supply outlet and had both of my tanks filled so as not to run out in the middle of a job. The people there didn’t actually fill my tanks; they swapped mine for two others which had already been inspected, then filled.
I wasn’t sure about the history of the tanks I’d bought at the swap meet, so the fact that the tanks I’d be using had passed inspection was reassuring. I also bought some of the 1/16-inch bare metal, mild steel rods mentioned in the books.
While I was there, I had asked one of the welders if he knew of any welding classes being given nearby. Sure enough, I was told, the local junior college had a welding class whose instructor came very highly recommended. I made a mental note to attend his next course on welding.
On the way home, I stopped by our FBO’s maintenance hangar, and they gave me some bent lengths of 4130 from their scrap box. That night, I stayed up to study about welding some more, and picked up one of the volumes I’d ordered, Welder’s Handbook by Richard Finch and Tom Monroe, published by HP Books, 360 North La Cienega Boulevard, Los Angeles, California 90048.
That book turned out to be one of the best of the lot. Richard Finch has had a lifetime of welding experience, including a stint with Piper, working on the prototype of the Aerostar 602P. His partner, Tom Monroe, learned his trade working with the Ford Motor Car Racing Division.
Since poor workmanship cannot be tolerated when you’re working on aircraft and racing cars which travel at 200+ mph, I figured both these guys knew what they were talking about.
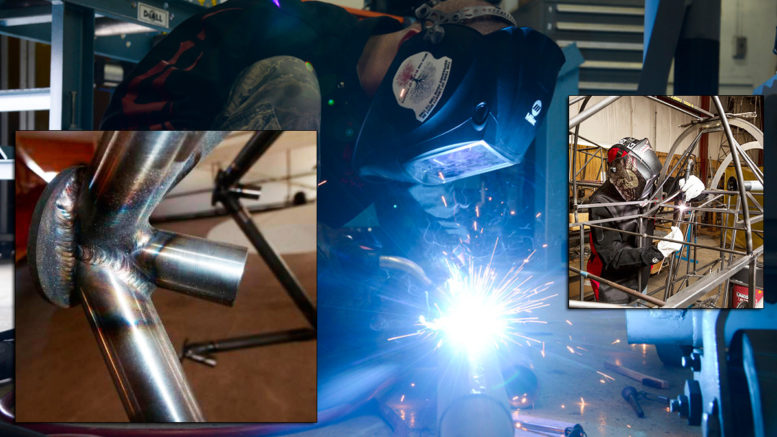
Typical airframe tubing welding joints.
Welder’s Handbook is all business — it cuts through the chaff and gets straight to the heart of the process. For instance, it states that the cleanliness of your materials is of utmost importance to making a clean weld, especially when working with 4130 steel.
It’s imperative that all materials be free of oil, dirt, rust and even dust. You’re advised to clean your piece thoroughly before welding it, and even keep your fingers off the materials, because the oil on your skin can contaminate the weld.
Speaking of the importance of cleanliness, because the welding operation creates a great potential for combustion, a dirty shop, cluttered floor, or trash and oily rags lying around are an invitation to a serious fire or accident.
So, if you’re a slob (like me), take their advice and clean up your act before you start welding. (And buy a good fire extinguisher, too.) The book very cleverly equates a weld with an ice cube. At a certain temperature, the ice cube is solid, so it can be drilled, shaped and worked. At a higher temperature, it starts to melt.
At an even higher temperature, it is reduced to a pool of water. Forming a pool of weld with your torch is much the same, then reaching and maintaining the correct temperature while welding is critical.
Although you can understand and absorb the concept of welding by reading about it, the best way to learn to use your welding torch correctly is to have somebody teach you how in person.
Of course, if you don’t mind wasting a lot of expensive gas and oxygen, you may be able to learn by yourself, but it’s much smarter to have somebody show you how it’s done. It’s not difficult, but you have to know what to look for to make the whole process work.
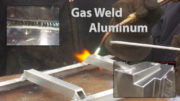
It’s also possible to weld aluminum with an oxyacetylene torch without resorting to hydrogen. Aluminum is slightly more difficult to weld than 4130, but it can be done, and if you take the time to learn how to do it yourself, you’ll be ahead of the game.
There are many small fittings on an aircraft which are fabricated from sheet aluminum and, before your job is finished, you will either have to do it yourself, or hire a professional to it for you.
Of course, you’re aware that all your work, including the welds, will be care fully inspected by an FAA inspector to make sure that the plane will be airworthy, so you want to do it right.
Besides, it’s you who’s going to be up in the sky in your airplane, and that’s the best reason of all for wanting to do a good job on the welding (as well as everything else).
If you plan to build other aircraft after you’ve completed your current project, or you’re going to want to tackle some other jobs which require welding, you may want to consider buying a TIG (Tungsten Inert Gas) welder — the other type of welder which comes highly recommended for aircraft construction.
TIG welding has many other names, including Heliarc and GTAW (Gas Tungsten Arc Weld). The original term for the TIG welding process was Heliarc, because the gas used in the process was helium. In recent years, the gas of choice has been switched to argon, argon/hydrogen or argon/helium mixtures.
TIG welders are the most expensive of all welders, but in the hands of an experienced craftsman, they can make outstanding weld joints. TIG welders are, by far, the most controllable of all types of welders. With a TIG welder, it’s even possible to weld a thin little piece of stainless steel to an anvil.
The secret of its effectiveness is the small pointed tungsten electrode (which is not consumed) which dispenses a very concentrated high-temperature arc with pinpoint accuracy.
Because of the accuracy of the electrode, it isn’t necessary to heat up a large area to start a puddle going, and this factor makes TIG an ideal choice for welding aluminum.
TIG welders can be quite complicated because of the variety of elements which come together at the nozzle of the torch. Also, TIGs come in two versions — air cooled and water-cooled. For occasional, small jobs, an air-cooled torch works just fine.
On units used for welding thick pieces of metal, or for those used over long periods of time (hours) it’s best to have a water-cooled torch. On water-cooled units, there are three hoses going to the torch — one for the gas, the electrode connection, and the water-cooling supply hose.
The torch itself has several key elements as well. Ceramic cups are used to direct the flow of inert gas over the weld puddle. Depending on the type of job being welded — engine mounts, flat seams or tubing — various sizes of cups are used.
A device composed of fine-mesh stain less-steel screens, inside the torch body, acts as a shield to reduce the turbulence from the inert gas. These “gas-lens” as they are referred to, aim the flow of gas to the working area. Because of this, if the welder needs to work in tight areas, he can extend his tungsten electrode further away from the nozzle.
The TIG welder works like any other arc welder — by striking an arc and keeping it working. The TIG welder is just a bit different because it has a high-frequency mode which starts the arc more easily, preventing the tip of the tungsten electrode from actually touching the work.
The welder starts the arc, a puddle is formed, then the welder inserts a bare welding rod into the puddle to form a weld bead. TIG welding units are considerably more expensive than the oxyacetylene type, and prices range from $500 to $1000 and more, depending on the type of TIG unit — less for the air-cooled, more for the water-cooled.
In either case, you must add the cost of other necessary supplies — tanks of gas, extra electrodes, welding rods, safety equipment, etc. Although TIG welds are considered by some to be superior to the oxyacetylene type, experts on the subject agree that it’s always best for a builder to learn oxyacetylene welding first, and then transition to other forms of arc welding.
Especially in welding, though, the skill of the operator is as important as the type, the quality and the depend ability of the welding unit. I’ve seen welds of both types on a variety of aircraft fuselages, and both were of equally good quality.
As for me, I’ve already tried to learn all the above techniques by myself, using the “old-school” method — “Trial & Error University” — but to be on the safe side, I’ve enrolled in the welding class at our local college this next semester.
The following is a list of companies where homebuilders can get information about various welding techniques and welding products. Though we believe this list of resources is current, companies do go in and out of business.

Be the first to comment on "Getting Started In Welding"