
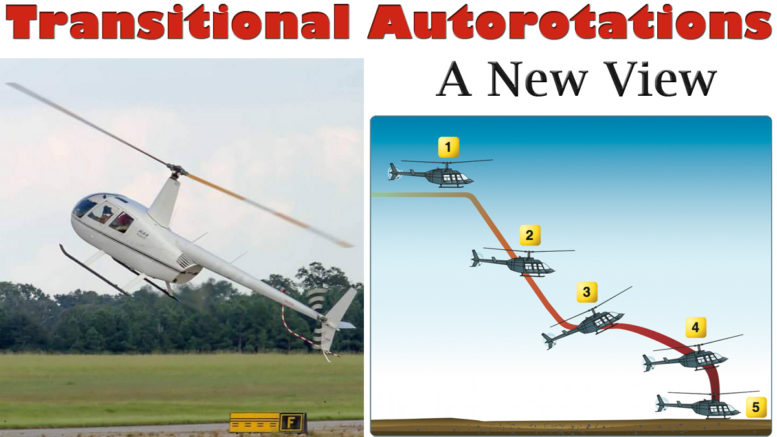
During flight training most instructors teach you how to perform hovering and cruise altitude autorotations. This is all fine and must be performed on your Private check ride. However, what about transitional autorotations?
You know the ones during your takeoff and approach profile? Yea, typically most instructors don’t spend much, if any, time with you on these. I was not grilled on these until I started my Commercial and CFI training.
And I wish I had a nickel for every auto I’ve performed between say 25 to 150 feet… departing and arriving. How many of you have practiced these? Come on. be honest. If not you should consider what’s at stake and have your instructor go over some or all of these with you.
You, your ship, and mostly your passengers could be at stake. One of my joys of being a CFI is I would practice these till I was very proficient in “every” helicopter I flew. The last thing I needed was to have to “save” a ship and/or its passengers from an engine or drive failure only to “not” know what to do.
No excuse. I was basically taught that “if you have enough height to flare, then do so, if not, then run it on”… departing or arriving. There are times when it is a combination of both. Maybe a hard short flare followed by a fast run on (only when over a hard smooth surface).
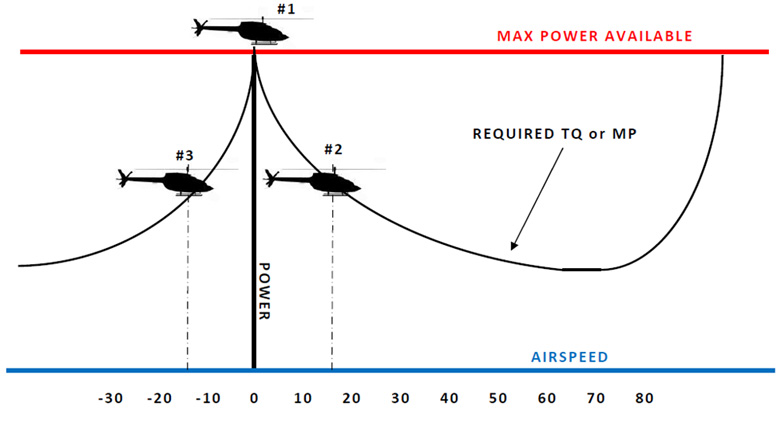
Sounds simple, but without training it was always that little “unknown” that festered in the back of my mind, just like you, if you’re low time. The HV Curve – The HV or Height Velocity curve comes into play here big time. There is a reason it is developed and every pilot should use it.
Let’s go over some of its basics. Ideally you will be departing along the un-shaded portion of the HV curve. Note: most HV curves say “recommended take off profile” within this area and even may have a dashed line.
By flying this “recommended” profile you limit the risk of totally destroying the ship and/or yourself. In reviewing the HV-curve, if your flight profile is anywhere within the lower shaded portion you will be too low and too fast to have a chance at a flare…mostly based on reaction time…even for the mid/high time pilot.
So a flare is out of the question along with dropping the collective…result…a high speed “hard” running landing. Most videos I’ve seen show the ship’s tail boom being sheared off due to the hard impact and possibly a roll over as the ship loses directional control during the high speed slide.
And again in reviewing the HV curve if your flight profile is anywhere within the upper shaded portion you will be too low and too slow to complete a safe auto. You just won’t have enough inertia or stored energy to stop the high descent rate. This, especially in a light rotor ship, requires that you have more speed, which equates to stored energy at the end of the auto.
Basic Height Velocity Curve Unfortunately, the “Kit” world does not typically create a “true” HV curve for the Performance section of the POH (Pilot Operating Handbook). Certified ships do. And they usually ball up a few in the process. Google “HV Curve” and you should see some interesting video results.
Even when I was with RWI the HV curve in their POH was simply a copied version. You can, as a pilot, only use it as a performance “guide”. Remember, it’s not in the Limitations section of your POH. It’s a guide and technically you don’t have to follow it. Foolish if you don’t though. How do you think it got its name… “Dead Man Curve”?
Side Note: Some experimental helicopter pilots will insist that you arrive much steeper and faster “in case something fails”. Not real world in my book and kind of backwards thinking. Say you come in hot and fast to avoid that “in case something fails” scenario. It’s a hot and humid day…and maybe it’s at a higher altitude than you’re used to. See where I’m going here.
Yup, settling with power. Please… please… please… don’t change your “normal” approach to something like this just because you think your ship may have “mechanical” issues. Instructors Note: It’s important that you stay extra vigilant during your entire departure and arrival profile. No distractions and all controls attended to.
The more complacent you are or if just one control is left unattended you risk the chance of a catastrophic outcome.
The “Departure” Auto
Once you leave a hover I consider it a “departure”; whether simply to relocate to a different practice area to hover, move over to another corner of a field to land, or to fly to a local restaurant.
You are leaving the realm of a simple hovering auto to whatever may happen till you get enough altitude and airspeed to safely perform a “standard” auto. If the engine or drive fails at this point we usually have one good and one bad thing happening. This depends on altitude and speed. First – we are likely climbing. This is good.
The inertia of the helicopter will continue upward… at least for a short period giving you a bit more altitude with which to work. Second – we likely have additional pitch dialed in. This is bad. The engine or drive failure at this point will cause a much more rapid decay of rotor rpm due to the additional pitch.
A faster reaction time with the collective is mandatory!!! Granted, once you enter ETL(Effective Translational Lift) your pitch setting may be slightly lower. Depends on your piloting technique. But in my book lower is better just for this reason. But before ETL you will likely have the same pitch (maybe a bit more) as within a hover.
There are several scenarios to consider here. The run on is most likely here. There is no magical point in airspeed or height that you can say, “This is where I dump collective and this is where I don’t”. Or, “This is when I flare and this is when I don’t”.
Way too many variables come into play, such as your ship, its rotor inertia, gross weight, wind, surface below, etc. Training and experience in “your” ship is key. And as I stated above your flare decision is based on saving the tail rotor. Too low and you’re sure to smack it and remove any chance of directional control.
If it happens during your takeoff profile, over rough or soft terrain, trees, houses, etc. and you’re likely going to destroy the ship and everyone in it. Nothing beats a good hard taxiway or runway for a running landing during the early portions of your takeoff profile during an engine or drive failure. Sure, nice short grass is tempting and often the only choice.
Just remember the possible outcomes. How hard and fast you run it on will determine them. Consider the possible results with an engine or drive failure over Homer’s bean field. The “Arrival” Auto Once you start your decent, from your cruise altitude to a landing spot, I consider it an “arrival”.
If you are proficient at performing altitude autos you may be fine to say 200 or 150 feet. Below that is another story. The lower altitude arrival autos are usually much simpler to pilots because they are already used to and hopefully comfortable with the standard straight in auto.
As I stated in the “departure” auto you usually have one good and one bad thing happening. Again, this depends on altitude and speed.
-
First – we have a greatly reduced amount of pitch dialed in. This is good. No rapid rotor rpm decay as with the departure climb out.
-
Second – we are descending. This is bad.
The inertia of the helicopter will continue downward at a greater rate until a stabilized autorotation is established. So depending on altitude you may need to react at a much greater speed. Again there is no magical point in airspeed or height that you can say “This is where I dump collective and this is where I don’t”. Or, “This is when I flare and this is when I don’t”.
There are way too many variables come into play. And you know that training is key. Basically it could be a standard auto but everything happening within seconds. Dump collective, flare hard, level and then set it down. Or, as with the departure auto… an instant run on landing without a chance of reducing collective or flare.
Well, these are the basics to the “transitional” auto. Sorry… no magical heights or airspeeds to respond to each and every possibility. My suggestion is to practice regular altitude autos and running landings for a while with your instructor and in your ship if possible. Then progressively reduce your entry heights during the standard straight-in auto.
Then lastly, practice autos from different positions during your takeoff profile. You may wish to remove some “high risk” portions knowing that they may limit you or your ship’s (and maybe instructor’s) abilities.
Always fly safe and smart. Bill Orth, CFII-RH Chandler Helicopter Service, LLC (skid shoe supplier) Former RotorWay Chief Pilot, Chandler, AZ


Be the first to comment on "Transitional Autorotations – Between the Hover and Cruise Altitude"