

If you’ve read the previous welding articles, you’ll either still be standing in the shop with lit torch in your hand, or you’ll be sitting in your living room, waiting to go to the shop. If you aren’t already in the shop, get there. This time around, we’re going to get serious about welding.
Here’s a quick review of the all-important torch-adjusting ritual: We want a neutral flame in which the oxygen has been increased just enough so that the blue (middle) cone of the flame has been just barely “sucked into” the inner cone, leaving a single cone which has slightly curved sides and a rounded tip.
We want to avoid an angular (pointed) inner cone, at all costs, since that oxidizes the metal, effectively destroying it. Once the torch is accurately adjusted, sit back and look at it: A welding torch could easily be thought of as a “heat hose” which throws out a narrow band of heat, similar to the way a garden hose with a high-pressure nozzle attached throws out water.
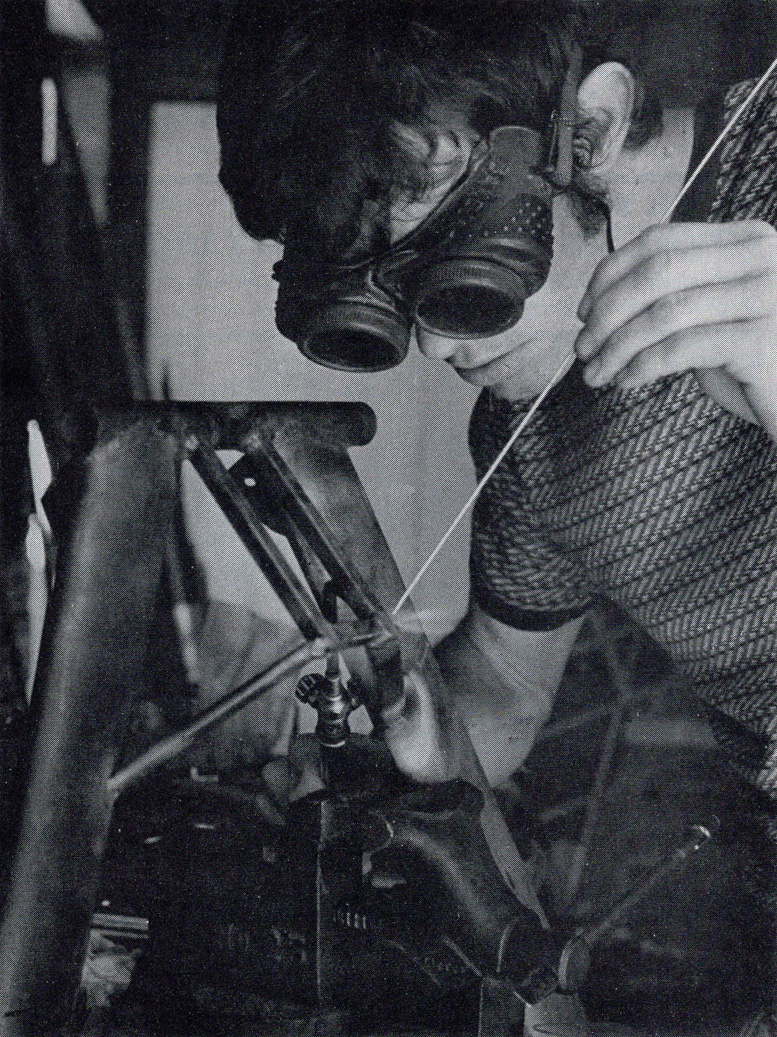
Safety goggles are a must and should be worn at all times while welding. Eyesight is impossible to replace, especially for pilots.
This image is absolutely accurate since the heat being thrown out bounces and spreads exactly like a high-pressure stream of water. Then look at the pieces being welded as sponges. Each piece of steel will absorb heat, like a sponge. It has a certain “heat sink” value, and that means it will keep soaking up heat until it is full.
So, as the narrow joint area is being heated, the steel attached to it is soaking heat away from that joint, making it difficult to get it hot enough to melt. It acts like a sponge and, like a sponge, the more steel there is, the more heat it will soak up. As the torch is held on the joint area, the surrounding metal is pulling the heat away.
It will continue pulling that heat out of the joint until enough has been absorbed that the immediate metal is “full” of heat, and the absorption rate slows down, letting the welder easily control the melting at the joint.
This process is known as “pre-heating” and its aim is not to get every piece of metal in sight bright red; its aim is to put enough heat in so that when the torch is pulled away for a second, the white-hot color of the joint doesn’t immediately disappear.
If the torch is lifted for a fraction of a second, and the color disappears, it should continue to be played on the general area, soaking it with heat. One of the primary causes
of bad welds is insufficient pre-heating.
Okay, so the torch is a high-pressure water nozzle, and the steel is a sponge; now think about how a water hose would react in that same situation. If the hose is pointed directly at the sponge (90 degrees), the full force of the stream impacts the area, causing the maximum amount to soak into the sponge (steel).
At the same time, it is splashing out evenly in all directions, as it bounces off the plate. If the hose is pointed at an angle, rather than splashing out in all directions, it fans out in the direction of the angle. Also, as the angle is decreased (moved more parallel to the surface), less of the heat goes into the metal, as it ricochets downstream.
Notice also that the distance from the sponge (metal) has a great impact on how well-focused the heat puddle will be. As it is pulled away, it expands greatly and loses its focus. For that reason, there is an optimum distance which the tip should be held away from the metal and a similarly optimum angle.
The distance varies for each tip size, but about 3/32 inches is typical, and 30 to 45 degrees will cover almost every welding situation. The ability to maintain an even distance and angle will be one of the prime factors in determining the evenness of the bead and the penetration.
Now, let’s heat some metal.
Start with some flat stock about two by three inches and 1/16 inch thick. Then get some fire brick (the beige stuff they line fire places with) which is available at most lumberyards for a buck or so apiece. Don’t lay the practice pieces directly on the brick, as that makes the brick an infinite heat sink.
Instead, bend some short pieces of welding rod into Vs, and use them as spacers to hold the practice pieces off the brick. A problem with using small pieces for practicing is that they don’t have enough heat sink(to simulate real welding situations, but they are just fine to begin with, since they present fewer heating problems.
Once the technique starts to improve, larger pieces can be used, or smaller ones can be clamped to angle iron to build up their thermal mass. For a situation like this, you’ve stuffed the O-size tip into the torch handle and set it for a neutral flame, about halfway through its adjustment range.
Set the practice pieces together, but with a gap slightly less than 1/16 inch between them. (The thickness of a hacksaw blade is about right.) A gap is needed, when welding, to give the metal room to expand, other wise pieces will butt into each other and push the structure out of alignment.
Take the torch and tack the pieces into position by melting a tiny portion at each end of the joint, and melting a little rod into it. No technique is needed here. Just melt it, and join the ends of the joint with a drop of welding rod so the pieces can’t move.
Now bring the neutrally adjusted inner cone of the flame down to the joint and play it back and forth on about an inch of the joint until it is bright red and stays that way for a second, when the torch is lifted.
When that happens, it’s time to start welding. For small pieces, that will happen almost immediately. Larger pieces may take as long as a minute, and really big assemblies may demand the use of a second torch to keep soaking the joint with heat, while it is being welded with the other torch.
Now, put the tip the aforementioned distance of 3/32 inch from the joint. Start at a steep angle, approaching 90 degrees and, as the material starts to melt, lower it to some thing in the neighborhood of 45 degrees, pointing in the direction of the weld.
As the tip is brought down to the surface, every bit of your attention will be directed at the tiny point right under the apex of the blue cone. That’s where the metal will be gin melting and the weld bead begins.
At first, it will be bright red, then the color will wash out to white, then it will start to get shiny and wet-looking. But don’t let the wet look fool you — that’s surface melting, and will accept a weld bead beautifully, but there will be no penetration.
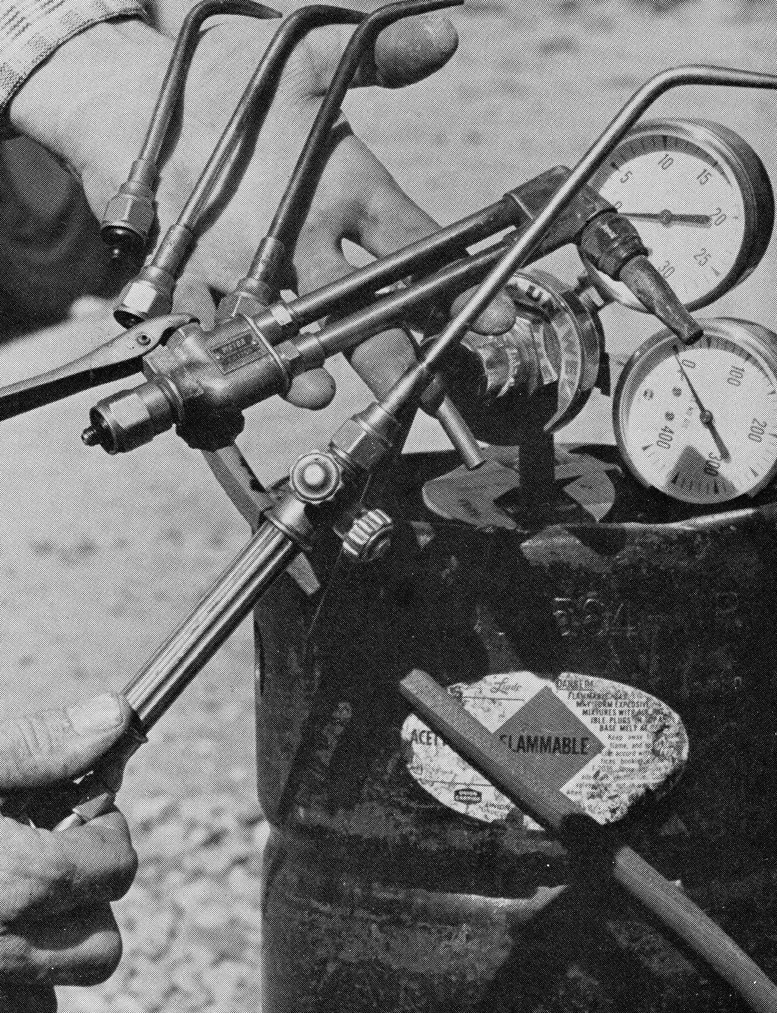
Different heads are essential to the welder working on aircraft structures, although experience will dictate exactly what sort of equipment is required for one’s own particular needs.
What the welder watches for is the next stage: The edges of the joint will first melt, and then a smallish circle, less than a quarter of an inch in diameter, will turn to liquid, forming a tiny puddle which can clearly be seen to be at least half as deep as the metal is thick.
The instant that happens, the welding rod is dabbed into the space between the cone and the metal. Just dab it in for an instant, and retract it, since the heat will melt a little off the end of it, causing the new molten metal to flow into the melted parent metal and thereby bridging the joint gap.
When that first drop of welding rod is in place, look closely at the little puddle which had been created. That tiny little spot of molten metal holds all the secrets of the weld, and the quality and appearance of the weld are totally controlled by how well the puddle is controlled.
It should be shaped slightly like a “C”, with the open side away from the torch, and facing the direction in which the weld will progress. It is high on the closed side, and flows down into the joint on the open side. The way it flows down into the joint is what indicates penetration is taking place.
If it isn’t down in the joint, it isn’t penetrating as well as it should. The ideal puddle is tranquil, with a slight skim on top of it, like cheese on onion soup. It should not be bubbling (too hot) or sparking (oxidizing because of too much oxygen or too much heat, or both).
Each time a new dab of welding rod is added, the new metal should quietly flow into the puddle, advancing it — as the edges of the joint are progressively melted. If the puddle doesn’t look and behave this way, back off and reevaluate all the parameters, since the weld being done isn’t a good one.
While practicing, the most important techniques being learned are the rhythm of dabbing the rod in, the exactitude of holding the distance and angle right, and an unbelievable fixation with the appearance and performance of the puddle. That puddle determines the strength of the airplane, so its is worth paying a little extra attention to.
While practicing, start paying attention to the role a steady body position plays in holding the gap even and keeping all movements smooth. Do absolutely anything necessary to steady yourself and give a perfect welding position.
That means you never weld without steadying yourself against something. That may mean sitting down and resting one elbow. More likely, it means moving the welding cart closer so you can lean against it. Do not weld standing up with no support. That makes you work entirely too hard to stabilize your hands.
Position is equally important: Do whatever is necessary to always have the torch moving right to left (opposite for lefties) and horizontal. That isn’t always possible in real life, but try for it. That one factor can make the difference between a good-looking, strong weld, and one which looks like a sparrow has dropped doo-doo into the joint.
These are the basics and, from this point on, everything is a variation on a theme plus practice, practice and more practice. But it has to be meaningful practice. That translates into trying to duplicate welding situations as they actually occur in an airplane, i.e., work with different types of joints and increasing heat-sinks.
It’s important to practice the different types of joints because each one needs a different type of technique in controlling where the heat goes and how much is used. This is primarily a function of the angles in which the materials meet and the simple fact that, as more pieces are welded together, the thermal mass and, therefore, the heat-sink become greater.
In other words, you are building a bigger sponge as more pieces are added. A classic welding joint is the common cluster joint found in all fuselages, but the increasing heat sink problem exists in any kind of welding.
In the cluster joint, the first piece is generally a “T” intersection in which v the heat required on the inner sections of the “T” is only slightly more than on the outer, flat portions. Then a diagonal is added. When welding the diagonal in place, more heat is needed for a number of reasons, the first being that the “T” joint already exists and represents a lot of metal.
Also, the diagonal includes several acute angles in which the heat requirements are drastically different from the inside of the angle to the outside. Also, in the acute part of the V, the heat can’t actually get to the bottom of the V and melt the very bottom because the heat goes into the tubing walls well above the bottom, so they melt first.
For that reason, there is a narrow area in the middle of the “V” where the weld bridges the gap well above the bottom of the joint, forming a thumb/forefinger-type web with a slight void at the bottom. This all takes a lot of heat, so the tip has been adjusted to the top of its range.
The hooker comes when the bead marches down out of the inner part of the to the outer part where about half that amount of heat is needed. To keep from putting too much heat into the joint and cooking (oxidizing) it, there are several choices: The best way is to slightly readjust the torch.
The second is to feed rod in faster, letting it soak up much of the heat which forces the bead to form much faster; and the last is to periodically lift the torch away, as the puddle gets close to boiling. At different points in different joints, all of these methods may be used to control heat.
If welding a “T” joint in plate, rather than in tubing, a slightly different problem is seen in directing the heat. The edge of a piece of steel will melt much faster than the middle of the surface because the corners of the edge come up to melting temperature faster.
So when welding a “T” joint, the flat surface will demand significantly more heat than the vertical edge. When preheating, most of the heat can be put into the flat surface, letting the peripheral heat catch the bottom of the vertical.
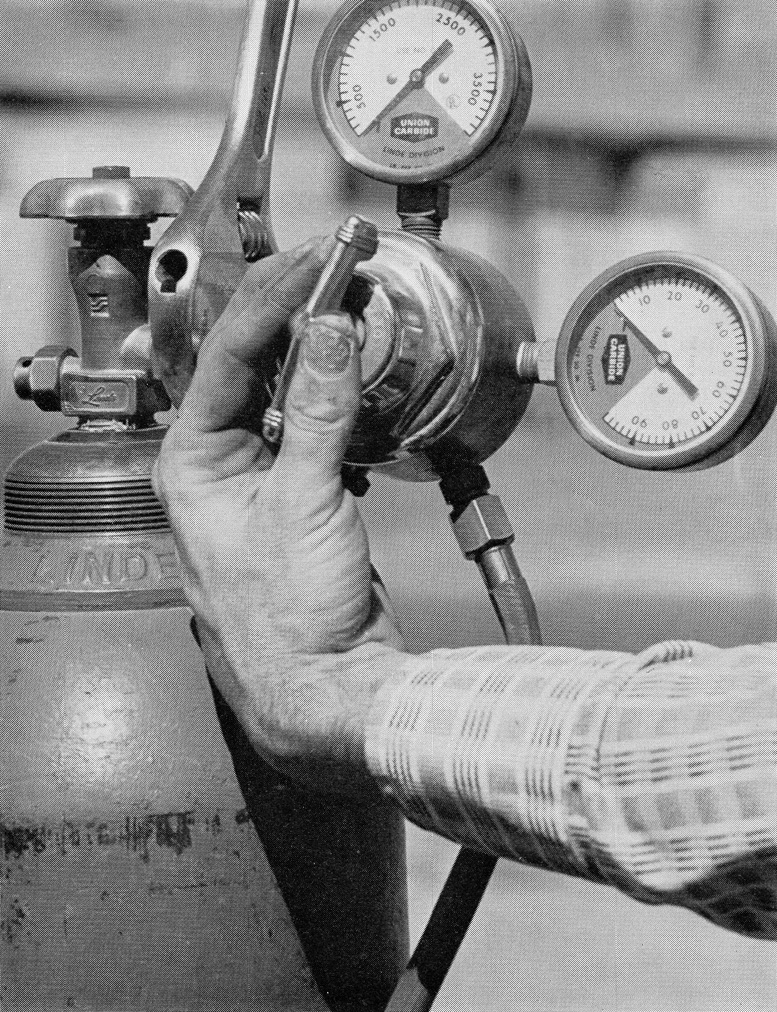
Close-up view shows the regulators. It is important that the welder treats these gauges with respect and makes sure that they are not damaged while being moved.
Done correctly, the weld metal will flow into the bottom of the joint and give an even bead, even though the actual center of the heat path was biased toward the flat plate. A more interesting heat-control problem pops up on something like “T” joints, when coming to the end of the joint.
As the bead runs off the edge of the sheet, a huge amount of heat has been built up. When the edge of the sheet is approached, this heat has no place to go, so the joint has no choice but to increase in temperature, which results in a tendency to melt, or burn away, the very end of a bead which terminates at the edge of a sheet.
That effect can be minimized by pulling the torch away from the bead periodically, as the edge is approached, letting the ambient heat soak into the plate before progressing. Other methods include welding into the middle from both edges, there-by avoiding the problem, and making the fitting longer than necessary and grinding back the edge, after welding.
Welding on an aircraft can range from making little do-dads for holding thingamajigs, to motor mounts and landing gear parts, to complete fuselages. Regardless, however, the fundamentals apply, and they are all based on the same thing; only the application of technique changes. Practice, practice, and more practice.
This practice may start by welding little pieces of metal on the fire bricks, and can be expanded to making shop stools out of scrap square tubing, or welding carts out of angle and conduit. But the bottom line still is that, every time a torch is lit, the attitude must be one of improvement.
The welder’s mind is going to be focused on that tiny, molten puddle and he is going to do his best to control it the way he knows it should be. Then, when the shop is full of hand-built steel jigs, racks and stools, it is time to start building airplanes. And that means the enjoyment really begins.
Be the first to comment on "How To Weld An Airframe"