

DIY Lightweight Helicopter Cabins
The future of building with composites
Courtesy: Custom Planes AUGUST 2004
Introduction to aircraft composites
SOME READERS OF CUSTOM PLANES may know that for quite a few years I have been developing an all-composite, 82%-scale replica of the F4U Corsair. (Take a look at my article in the December 2001 issue).
The building of the plugs, molds and parts is not where most my time has been spent. A lot of my time went into planning and preparation. I think most of my time has been spent learning techniques for doing quality fiberglass lay-ups.
In June of 2002 I attempted to make the wing skin for my prototype. This attempt was to build the top skin for the left wing center section. That is a 30-square-foot part. I was hoping to bring the wing to AirVenture 2002.
Well, everything that could have gone wrong that day did. Worst of all, the reversing valve in my shop’s air-conditioner/heat pump opened and started heating my shop up to a sweltering 95 degrees. Even though I had done all of my preparation work well in advance of my lay-up, I could not complete the lay-up before the resin started to gel.
Since I was working with Vinyl Ester resin, I couldn’t control the set-up time to the extent one can when using Epoxy resins, especially when the temperature is above the temperature for which the resin has been formulated. I ended up with a mess of bubbles and dry spots. Anyone who knows anything about composites knows that a part like that gets thrown away.
A day or so later, I was all prepped to start over and do it again. On that day, everything went the way it was supposed to, but the resin gelled before I could get the vacuum bag in place. Nice looking part, but more bubbles and dry spots. I realized that one guy just couldn’t do a large lay up consisting of multiple layers of fiberglass and a core, without help.
I needed to find a way to build my large fiberglass parts, so I investigated my alternatives. I went to a few fiberglass fabricators. When I told them I needed help building airplane parts, they either laughed or slammed the door in my face.
Then I approached a few airplane kit manufacturers. Even with me supplying the materials and molds, their prices were unbelievable. At some point, I remembered a process a long lost friend had once mentioned. He called it “vacuum infusion.”

Setting up a two-square-foot test. This sample consists of one layer of 21 oz./yard of tri-axial knitted fabric on each side of a 3mm core.
One day I did a word search for “vacuum infusion” on the Internet. I found a million or so sites about the subject. Most of the information was very sketchy. It seems one company holds a lot of patents related to vacuum infusion and they keep their cards close to their vest.
I did find a site that sold a DVD training course for the process. I purchased the DVD and became an overnight expert. Right! I still had a long way to go before infusion became the answer to my problem.
The flow media and resin feed tube can be seen at the bottom of this photo.
So what is vacuum infusion? Simply put, vacuum infusion is a method for wetting out composite materials whereby vacuum draws the resin through the “structural matrix” (that means the fiberglass and core, or the “composite sandwich”). Simple, right? It is and it isn’t.
Just like everything else involved in working with composites, you must learn the proper procedures and techniques to do quality work. In the case of infusion, you have either spectacular results or spectacular failures.
In Layman’s Terms
I’m going to oversimplify the process to better explain it.
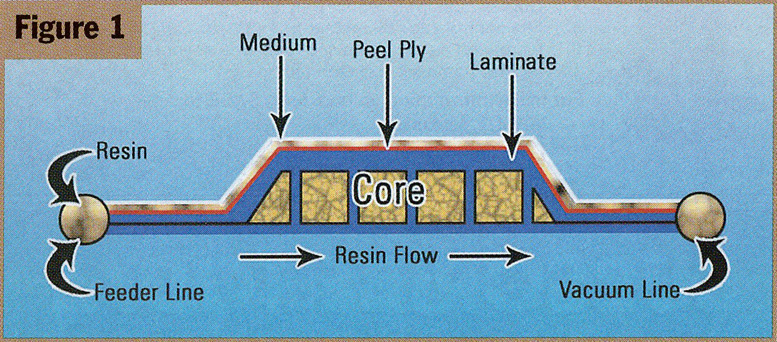
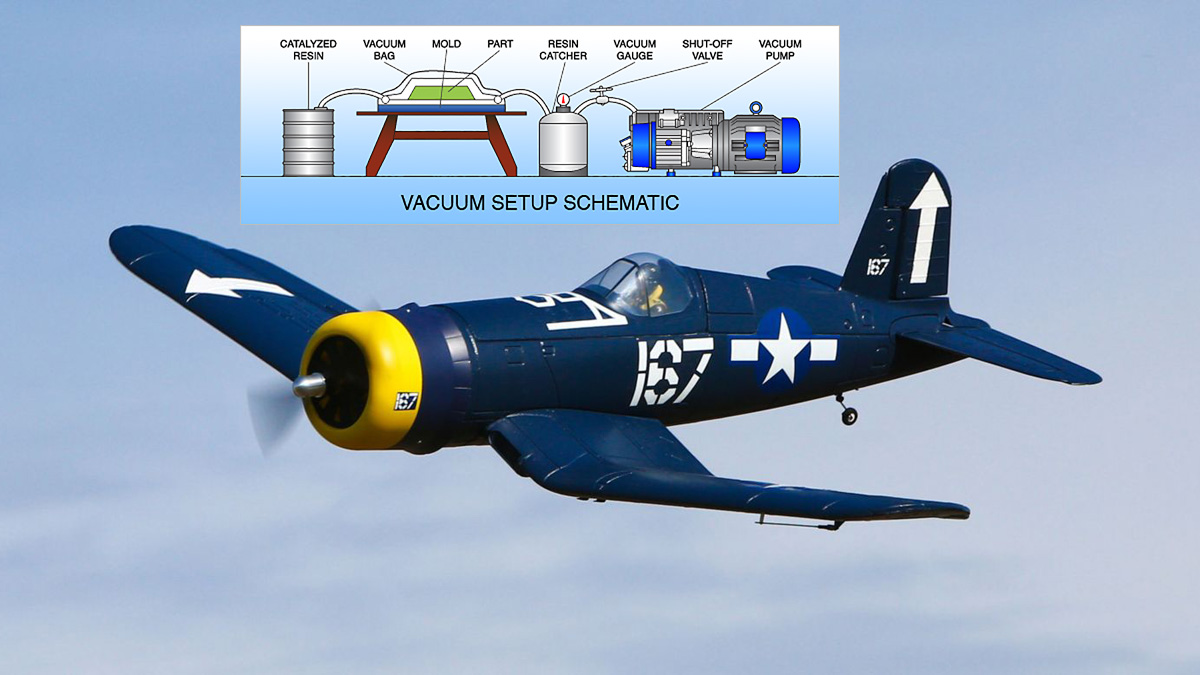
To infuse a part with resin, you first put all of your composite materials, the fiberglass and the core, into the mold. This is called “dry stacking” (Figure 1).

The vacuum line has been added at the top of the photo.
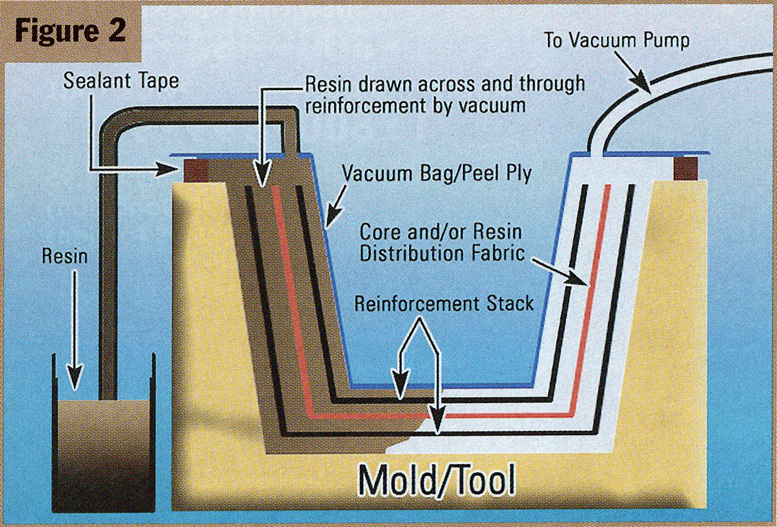
You then place a sheet of plastic (the vacuum bag) over the materials and seal it all the way around the mold, just like you would if you were going to vacuum bag a hand lay-up. You insert and seal a vacuum hose through the plastic at a predetermined location.
At another location, usually on the opposite end of the mold, you insert and seal a feed hose that goes to your resin reservoir (Figure 2).
The “vacuum bag” is in place.
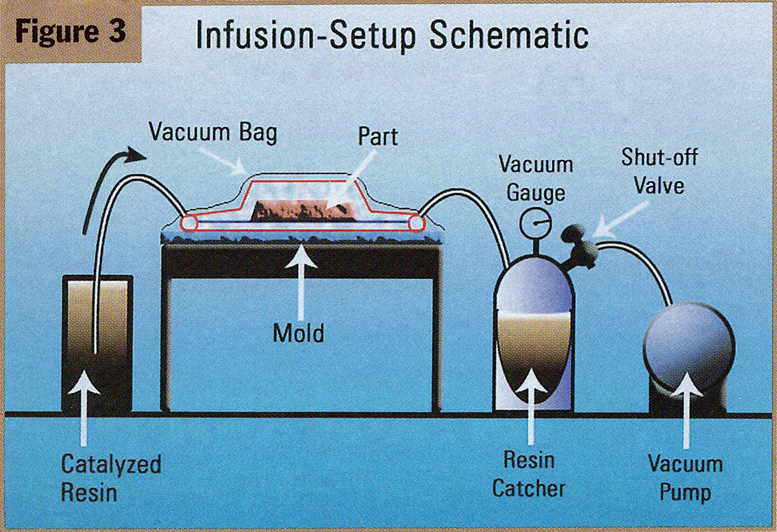
The feed hose must be closed off with a valve or clamp at this point. Now you allow the vacuum pump to evacuate the air trapped between the mold and the vacuum bag.
This compresses the dry stacked materials to some extent. I like to keep it under vacuum for about a half-hour before introducing the resin. This ensures you of as close to a perfect vacuum as is possible and gives you time to check for air leaks.
Vacuum has been applied to the setup.
When everything is under control, the resin is mixed in the reservoir and the valve is opened (Figure 3).
The resin then flows through the materials. It is really fun to watch, especially if you are used to the messy process of doing hand layups. There is no mess and almost no smell. The only surface area of resin exposed to the air in your shop is the surface of the resin in your reservoir. I usually use a big coffee can as my resin reservoir.
The resin supply valve has been opened and is flowing into the flow media.
That means less than a square foot of area venting fumes, as opposed to the entire surface area of a hand lay-up, before applying the vacuum bag. In the case of my airplane, that can be up to 100 square feet at a time.
With Vinyl Ester or Polyester resins, the styrene smell is really cut down to almost nothing. By the way, this type of procedure is considered a closed molding process and is going to be mandated for the composites industry in 2005 by the EPA.
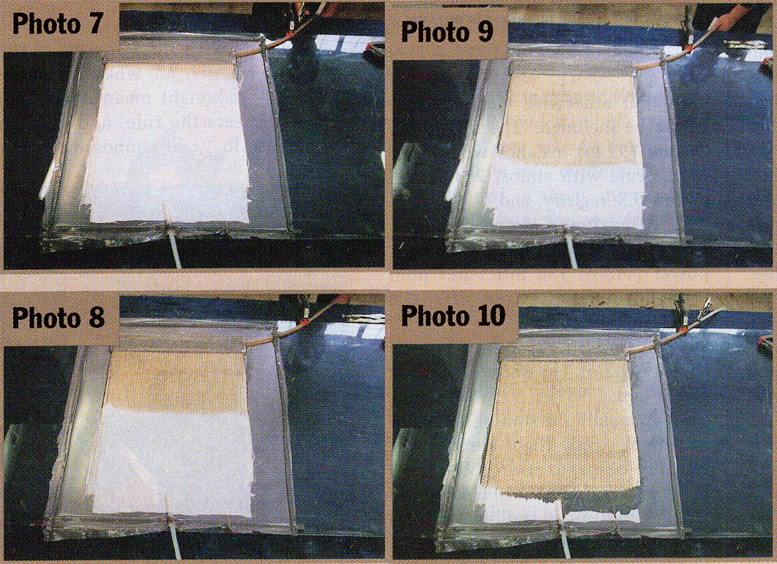
This series shows the flow of resin through the material stack. Note the hexagonal shape of the flow-enhancing core material. This combination will weigh about 12 ounces per square foot when cured.
OK. Now comes the bad news. As I stated earlier, I really oversimplified the process. There is too much information for one magazine article, and a lot of what needs to be learned requires hands-on training, so I will highlight some of the things I discovered through many months of trial and mostly error.
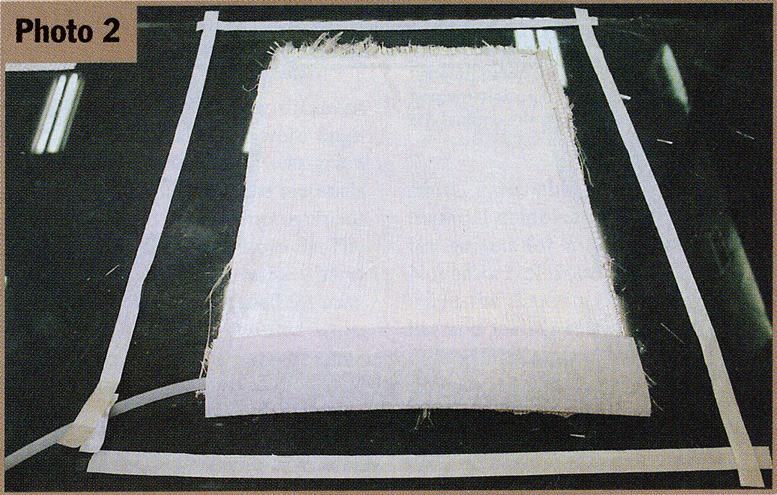
My first few attempts at infusion were flops. Normally I go full steam ahead and try a new technique on a real part. On an airplane the size of mine, that always means a lot of materials. If it flops, a lot of expensive materials are wasted. This time I tested the process on a small lay-up of about two square feet (Photo 1).
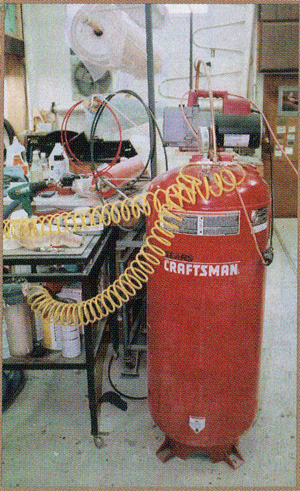
My vacuum equipment. This consists of a vacuum pump Installed on top of an old air compressor tank. The resin catcher is an old water filter unit.
Little did I know that many attempts would be required before I started to get good results.
The first problem I discovered was that the vacuum bag was too tight against the mold surface at the point I was feeding the resin. This stopped the resin flow as soon as it arrived at the end of the feed line.
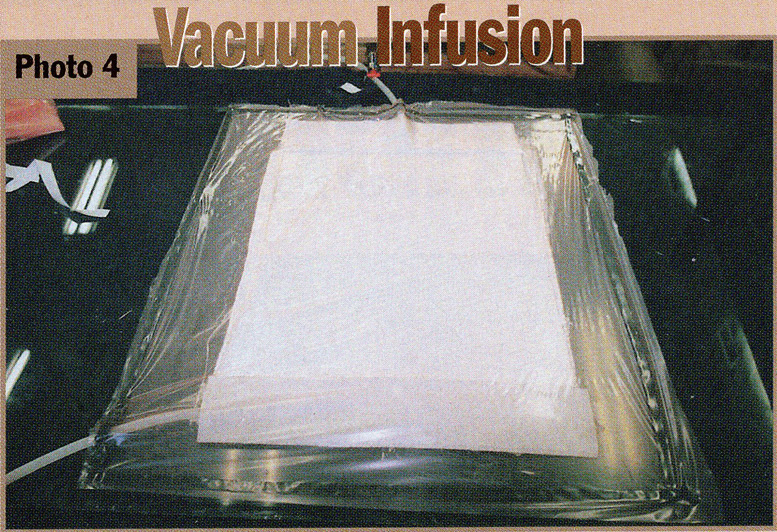
I tried different ways of feeding the resin and found that there needs to be a flow-enhancing material (called a flow media) between the mold and vacuum bag and also touching the laminate (Photos 2 through 4).
Trying this improved the initial flow of resin, but the resin stopped at the laminate.
After a lot of testing I found that woven fiberglass (like 7781) would not allow the resin to flow. I tried some “knitted” materials and found them to flow well.
A knitted fiberglass is basically multiple layers of unidirectional fiberglass loosely stitched together with the required fiber orientation. I still was not getting the flow rate I was looking for.
[FreshProduct productGroup=”vacuumkit_1516431938″ showimage=”yes” showprice=”yes” showtitle=”yes” align=”right” buttonclass=”” buttontext=”Buy Now” newwindow=”_self”]
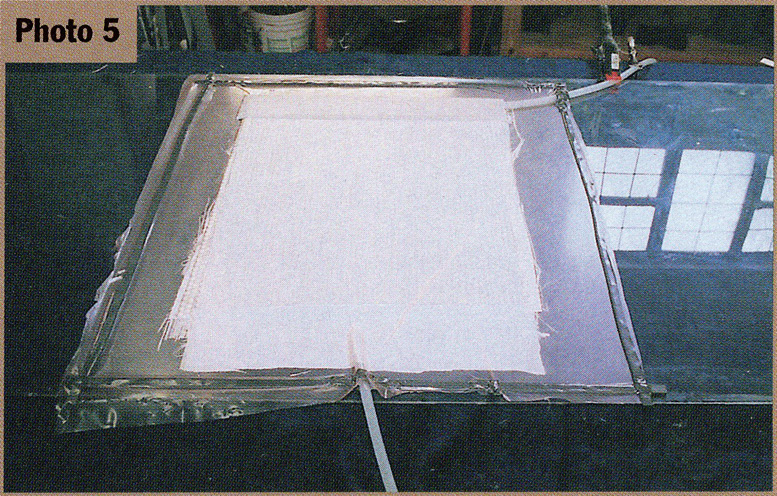
I learned of a few different core materials that were engineered for infusion.
I was given some samples of these materials and found a vast improvement on my flow rate (Photo 5).
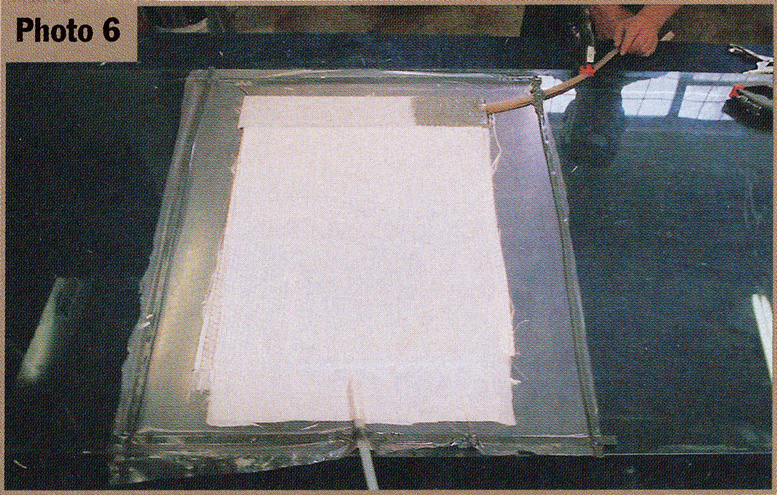
The last step in this process was to get some resin designed for infusion.
A few companies were making reduced-viscosity epoxies and Vinyl Ester resins engineered for infusion.
I was supplied with some samples of these new resins to test (Photo 6). This was the turning point.
I was now getting spectacular results. I could infuse a 30-square-foot part, consisting of six layers of fiberglass and a core, in about 15 minutes (Photos 7 through 10).
One guy cannot wet out 30 square feet by hand, place a vacuum bag and draw a vacuum in 15 minutes.
Infusion’s History
The boat-building industry developed vacuum infusion for the most part. The materials I was experimenting with were designed for boats.
[FreshProduct productGroup=”resinstarter_1516434721″ showimage=”yes” showprice=”yes” showtitle=”yes” align=”left” buttonclass=”” buttontext=”Buy Now” newwindow=”_self”]
The fiberglass was very heavy and the core materials were very thick and of high density. With the help of a few manufacturers and their sales and engineering staffs, I was able to develop and test material combinations that were better suited for airplanes.
Between November of 2002 and late 2003, I spent the majority of my time building and testing samples for the engineers to test (read that, destroy). I now have a catalogue of fiberglass and core combinations to use in the construction of my replica Corsair.
The year I spent learning vacuum infusion and testing material combinations will allow me to do most of my work in a clean environment with little or no help.
It will save time and materials, which means money. All of that pales to the superiority of a vacuum infused part. There is no comparison to a hand lay up part. I found a consistent 60/40 ratio of material to resin.
With infusion there are no dry spots or voids. This means a consistent quality through the whole part. Any homebuilder can learn this procedure, and the equipment cost is not much more than that of vacuum bagging.
[FreshBundle bundle_id=”vacuum-1_001″ layout=”grid” columns=”3″ custom_title=”” custom_buy_button=”” custom_cta=”” target=”current” ]
By the way, I did a vacuum infusion forum at AirVenture 2003 and I hope to do one again this year. For more information about my project, visit www.Corsair82.com.
Be the first to comment on "Vacuum Infusion – Helicopter Composites"